Friday, 31 December 2010

Andrew Brooks Talk

Earlier in the year I went to a talk at the Whitworth Art gallery by Andrew Brooks. Andrew Brooks is a graduate from our college and has gone on to be a very successful photographer and digital designer.

He started by showing us some pieces of work he had produced like this piece below:


He then went on to break down the image in photoshop to show how he had composited it all together. It was fascinating to see his layers after layers of changes. He explained how he takes hundreds of photos and selects areas to use in the final composition. His aim is to create seamless pieces of work that could be an actual landscape isn't. It was great to see how he worked and the fact he broke it down for us like this was great as you can actually see on screen the way he has produced it.

He went on to speak of how he likes to try new techniques and over the last year or so he has been testing with making 3D films pieces. He made them as Cross-eyed pieces or alternatively you could view each screen with the corresponding eye. It only occurred after he had projected some of his work on a screen behind him how weird we all must have looked sat there cross-eyed admiring his work. It was great to see though and I had no idea a piece like this could be produced this easily. Since then I have seen this method repeated all over. There were screens set up like this in the Film Archives in Berlin and is also the method Stewart from the Neighborhood had used to create his 3D work. Andrew Brooks had put a lot of time and effort into buying and building his own equipment for his 3D filming but the results really paid off.


This has shown how artists and designers are having to move with the times and keep up to date with the techniques they are using. This makes me want to consider doing some 3D work in the future. I think I will if I have the time and resources available as that is the direction everything is heading into at the moment. Andrew also spoke about he he enjoyed being self employed and working whereever he wished. This made a lot of sense when thinking of the freedom you would have when moving around jobs and companies but I still can't help but think I want experience before I even start considering freelance. I want to get in the industry and see how it works before I take any huge steps like that.

Check Out his website if you have the time:

Thursday, 30 December 2010

Museum of Film Archives

While in Berlin one of our tutors had managed to get us into the archives for the “Museum Of Film” where everything is kept when not on show in the museum itself. It was a bit of a mission to find the archive building but when we got there we found it was worth the wait. When we got there we were able to look around the 3 large rooms. The first had the opportunity to see some of the original artworks for a large range of films exhibited at the museum. We saw some of the original concept art from the film Metropolis that was filmed a Studio Babelsberg. These charcoal and pen drawings were beautiful and you could see exactly why the film ended up looking the way it did. These photo’s really don’t do them justice.


After these we saw some costume designs before some real surprises were shown to us. We saw and oscar that had been donated, the actual hook used in the film Hook and to finish with they showed us one of the model Gremlins used in the films.


After we saw these were entered the next room where there was reels upon reels of film. After these though was the real treat from the archives, which was all the cameras used in years gone by. The guides told us that there wasn’t a camera in there from post 1960’s.


To finish with we got the opportunity to see an original Lotte Reiniger piece of art with the silhouettes that made her famous. I couldn't believe how so much of this was in storage and not on show. We were so lucky to get the opportunity to go and see these but it seems a shame that it is all there behind lock and key. There are some priceless pieces of art there that should be really appreciated rather than hidden. We were convinced that some of the stuff we saw should have been in the museum instead of some of the things we saw but this just show how opinion driven our field is. Someone's love for a piece could be outweighed by someone's hate of it. I just hope this isn't the last seen of these pieces and more people get to be as lucky as we were.

Studio Babelsberg


When we arrived at the worlds oldest large scale studio Babelsberg we were greated by our guide and given a bit of information about the studio itself. It has been producing films and working as studio space since 1912. It has been the set for huge films such as Metropolis, Inglorious Bastards, Valkyrie and The Bourne Ultimatum. It offers services such as a replica Boeing plane with removable walls and cockpit as well as the worlds larges indoor water tank.

After we met our guide she took us to see all the separate areas of the studio. The studio is vast and the size of a town itself. Even the streets were names after famous directors and producers. We started by looking around the prop houses. It when you see all these behind the scenes workings you can truly respect the amount of work that goes into these huge productions. These prop houses were unbelievable, I have never seen anything like it. There was row after row of catalogued objects that could create or recreate any scenario you could think of. I couldn’t believe the work went into making the scenes.


After this we were shown the costume department and the rows upon rows of clothes and costumes such as military outfits all the way to cabaret. After spending our time trying some costumes on and looking through the vast collection we entered a room with the famous costumes in that the celebrities had worn. We saw costumes from Inglorious Basterds and Jude Law’s outfit from Enemy At The Gates. From here we went on to see the carpentry department and the plastering departments that created everything from huge ships to the mask used in V For Vendetta.


The last 2 areas we saw were the most impressive. First we went into the second of the 3 large filming studios where there was the some of the set left from the filming of The 3 Musketeers that had taken place there the week previous. This was by far the best part of the whole trip to Berlin! I cannot go into much detail as to what was inside the studio until the film is released as we said we would not reveal details but the set we got to walk around was unbelievable and the fact they had built it all from scratch. After seeing the rest of the studio I think I could finally understand what effort had gone into building it.

The last section we saw was at the other side of the studio and was a complete street that had been created on the side of huge containers that were stacked over 3 stories high. The street resembled a typical street and could be changed to directors wishes. It had been used in films such as Inglorious Basterds and the Pioanist.


All of this made me think of earlier in the year when I really wanted to get involved with film. Looking around all these separate warehouses showed that there are many areas in which you could get into the film industry. This just shows the amount of opportunities this studio has as well as showing the true scale of the place. I could be quite easy to get lost in the huge teams working together to create these scenarios but that is what this studio is all about. Everyone, every department are working with all the others to create one final outcome.

I am so happy I got the opportunity to see this studio. I made me think a lot of where I wanted to end up as it brought back thoughts of wanting to go into the film industry. The whole studio was fascinating but when I sit back and look I realised thatyet again it would be easy to get lost in the movie business and end up just doing the same thing over and over. I want to work on projects that I can see through until the end as well as working on the ideas rather than just being a production boy. This is the reason why I feel I would be best suited going into the advertising industry.

Saturday, 18 December 2010

Old Footage Tutorial

After my feedback from my testing I looked back to what I really wanted to do with this piece. I was not happy of the grading of my film. It just made the footage look darker than it needed to be and it was hard to see colours that separated the sequences. I found this tutorial on making your footage old:

http://www.videocopilot.net/tutorial/old_film_look/

This was a great help showing a more convincing way to make my footage look like it had been taken on a 16mm camera. I wanted this style because of the Plus Guest piece I posted earlier. This has enabled the colour filters I put on the footage to be a lot more visible, plus they also work as vignettes on tablets.

Tuesday, 14 December 2010

New Composition

After the feedback I got on my tests I have come up with this as my final composition. I have used the idea of an abacus with the tiles on the bars. This would be the final shot of the animation after the tiles have rotated. I think the shadows really help show that each square is a tile as opposed to a hole with footage behind. I have also changed the colour of the type to relate to the footage in each row. I think this has worked well and after softening the shadows and reshooting some of the footage I will be ready to render.

New Composition

Tiles Research

One of the main pieces of feedback yesterday on my tests was that the tiles didn't look so much like tiles and more like holes. It is because of this I am really focusing on this to see how I can change the piece to show the tiles. When experimenting with the tiles to make them more obvious I began to think of other tiles. Immediately Scrabble jumped out in my mind. These tiles are iconic but as this photo shows underneath the reason they look like 3 dimensional tiles is because of the shadows around the tiles which give them depth. This shows I need to experiment with lighting to show the individual tiles.

Scrabble Tiles

I also thought about the movement of the tiles at the end of the piece. They rotate to reveal text on the rear of the tiles and I think this needs to be emphasised. When considering this I thought how could I show that the tiles are in sequence and show that they all react with one another. For this reason I have decided to experiment with the idea of an abacus to show the formation of the tiles and have them spinning on bars as it is a piece that can be interacted with.

Abacus

Monday Presentations

These are 2 tests I produced to show on the Monday before hand-in. Here I played with creating the tiles, projecting the footage on them before rotating the tiles to reveal the text. As a first test it worked well as I got a lot of feedback to improve the piece. The final composition will look quite a lot different to this but that shows that these did there job.

I also had the opportunity to experiment with sound. I have been given some tracks by the Pepsi run competition to use and I experimented here with 2 possible choices. The is one rock track which feels like it is out of the 70/80's and an up tempo techno track. After talking with peers I think the techno track works best as it helps show the busy nature of the piece with multiple things going on.

Test 1

Test 2

The feedback I got from my peers was that it was hard to see so hard to follow. Because of this I have decided to look at making the tiles bigger and reducing the vignetting used on the footage to make each piece of footage easier to view. It was also mentioned that the tiles looked more like holes to start with so I need focus on making the tiles look more like tiles and show how the interact with each other. I have 1 colour running through each line of film and it was suggested that the colour of the text should emphasis this and tie the piece together.

With all this feedback I realised I have a long way to go with this piece for my final piece and with a reshoot that is supposed to be taking place on Wednesday I have a busy week ahead.

Thursday, 9 December 2010

Text testing


This is the initial text test I have done. On the rear of the tablets/screens are letters that make up the sentence:-

"Why not make a change?"

This line is to interact with the audience. After seeing this I want people to think "why am I doing the same thing daily", why not change a curtain part of your life and who knows what else you could change. I have also rendered an occlusion layer to create more depth to the 3D text making it really jump off the screen to the audience. This will also give tho whole piece great depth as the tiles revolve.

Textured layer

Occlusion layer

The test below is just experimenting with the sentence turning and appearing on the back of the screens. The footage is more test footage I used just to show the general idea of the screens and you can also see here how well the vignette effect works. The footage does not have the vignette on it here, it is actually the light in maya that creates this effect. I prefer this method as the lights can stay in place to light and soften the text as it revolves also creating depth when they cast shadows.


Grading Tests


This is my first test with grading some footage. This is a sequence from an early project and I wanted to see if I could create a vintage look. I have ended up using some scratched textures and and feathering some plastic textures to create these results.

Plastic feathering

Scratches texture

I wanted to end up with footage that looked like it had been through a lot and found after being neglected for a long period of time. I think it has worked well. I have not added the vignette as the lighting in the final maya piece creates the it on each tile individually.


This is my next test with the same footage but I wanted to try it with the intro and outro footage given. These I have to add on the 1 minute final outcome which leaves me with just 49 seconds to play with. I have also been supplied with music tracks I can use so I need to find the one that best goes with my fast paced piece. This is the next area I need to bee looking into.

Vignette Technique

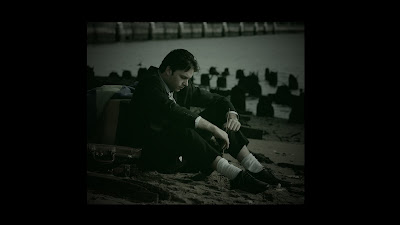
Looking at previous research I have conducted, I have found that a lot of the vintage footage had a vignetted look. This is best shown using this image below:-


This is a technique I want to use in my piece as I believe it ages a piece well when combined with grading the footage. This can be done in After Effects post-production once the footage ha been collected. I can radial feather a layer produce this kind of effect. I need to se if it darkens the edges of the tiles too much that they blend into the background which is not what I want to happen. Now I will start to play with textures to produce a scratched and abused piece of footage.

Footage style frames

These are my initial tests for my footage for my final piece. Here I got some photographs and framed them up as I wanted them. I played with colour layers over the top as filters to change the mood and composition. I have tried to use a vignetting technique as well to produce similar results to the "Plus Guests" piece I put on my blog earlier.


Style frame 1

Style frame 2

Style frame 3

Wednesday, 8 December 2010

The Neighbourhood Studio Visit

The Neighbourhood Showreel 2010


After ringing the project manager Sarah Baker last week myself and 2 others went on a portfolio yesterday morning to The Neighbourhood's new design studio. After turning up at their new Lever Street Studio I instantly loved the new place they had just got for themselves. The building itself is fantastic as it has been modernised but still keeping some of the traditional elements of the build. When walking in the studio we were greeted by one of the designers and we sat in their waiting area while the creative director Jon Humphreys had finished in a meeting. From here we could see the studio and the fact they had just moved in the week previous as there were pictures ready to be hung and boxes to be sorted. Even though they had only been there a week they had already made the space their own by adding traditional furniture and creating a coffee table out of old books. This is one of the best studios I have been to as it felt like The Neighbourhood had a home. Some of the other studios I have visited have been quite empty and almost office-like, where as this you could tell they are a design company and they wanted to express that.


After a few minutes we saw the meeting room empty and Sarah (project manager), Jon (creative director) and Stewart (animator, designer and 3D enthusiast) come across to great us and introduce themselves. We then followed them into their new meeting room and sat around their huge traditional dining table. After looking up and seeing all along the wall the awards they had won from various competitions I knew I was in one manchester best design studios. We spoke to the 3 designers about our course and what it was we actually do. They were very interested in what we had to say and where we saw ourselves in the future. They asked where abouts in the country we saw ourselves heading after the course had finished and after we all showed interest of staying up north and hopefully at a design studio around this area they explained that that is where a lot of the business is moving and that we should definitely check out around here before venturing south.


You could tell that the designers liked how we spoke of our work and how we presented them our work. They expected us to take along disks and to use their Tv to show the work but when we said we had brought our laptops to show them our work I think they could tell we were making an effort to show what we were all about as individuals. After the others had shown their work we had a conversation with Jon about how we had recently produced showreels to show the work we had been producing over the last few years. He explained how they can sometimes do more harm that good and that it was important the amount of content you put in as you don't want them to seem repetitive and that a designer only does one way of working. After this Sarah, Stewart and John all looked towards me and I decided that I was still going to show my showreel I had produced. I am glad I did, they were all impressed by it and Jon mentioned he liked the fact I showed my working methods in there as well as my work. After this I showed them my Big draw ident and making of to explain how I put it together and the effort I went through to get the results I did. Also I wanted to show I could do a range of work from Maya to stop-motion. After this is explained the ideas behind ad showed my title sequence which I think went down well.


To finish with they showed us a piece of their work that Stewart had recently made 3D post-production. We all got handed the 3D glasses and were shown how the design world is changing and how ahead of the game The Neighbourhood were. They have been ready for some time for these types of jobs to come around and produce work of which I have never seen before. Stewart explained that making a piece 3D is something else he has just put in his toolbox much like other techniques such as using depth of field. After this we left as we had already taken up plenty of their time and they have deadlines to meet. It was a fantastic studio to visit and I hope one day I can work in a place just like it. The people were friendly, talented and just as passionate about the subject as I am which, is what I want when I leave. This is definitely a studio I will keep in touch with as I think they will be a great contact for the future and hopefully I will be able to go back again sometime.